Curved Poly
Intro
General Features
Shape Editing
First Steps into Shape Editor
User Interface and Settings
Operators and Views
Pointings Operator
Vertices
Handles
Edges
Polygons
Selection Operator
Tessellation Operator
Elasticity and Edge Normal
Curved Poly Inspector
Primitives and Demos
Assets and Libraries
Advanced Shape Editing
Hide Operator
Shape Control Operator
UV Operator
Backgrounds Operator
Creation and Composition
Anatomy of a Curved Poly Model
Create Operator
Geometries Operator
Unwraps Operator
Edit Operator - Overview
Edit Operator - Making Custom Primitives
Edit Operator - Inspecting and Fixing
User Interface and Settings
Gizmos
A Gizmo is an icon which Unity can use in the editor interface
to visually distinguish specific software modules from the others. There are four gizmos for Curved Poly : the Curved
Poly gizmo, the Curved
Poly Asset
gizmo, the Curved
Poly Asset gizmo, the Curved Poly LoDs Table
 gizmo anb the
Curved Poly LoDs Table gizmo. If you don't see
such icons in the Inspector, then probably you can find them at Assets/CurvedPoly/Gizmos.
If this is the case, you need to manually move the Gizmos folder from Assets/CurvedPoly/Gizmos to Assets/Gizmos.
gizmo anb the
Curved Poly LoDs Table gizmo. If you don't see
such icons in the Inspector, then probably you can find them at Assets/CurvedPoly/Gizmos.
If this is the case, you need to manually move the Gizmos folder from Assets/CurvedPoly/Gizmos to Assets/Gizmos.
This in an optional step. You can use Curved Poly - Shape Editor with or without Gizmos, so if you think you prefer to avoid moving Curved Poly assets from Curved Poly folder avoid this step.
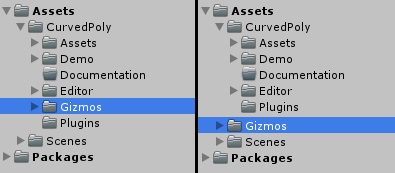
Fig. 1 Move Gizmos folder to see Gizmos in Unity Editor.
Scene View Menus
Curved Poly - Shape Editor uses a huge amount of tools which are directly available in the Scene View. There are a total of three areas you need to check:
- (1)Operators: click on one of the these buttons to change the way you can interact with your model. You can have more Scene Views opened at once, and you can use a different operator in each view.
- (2)Visibility Settings Buttons: toggle buttons to show/hide different controls on the scene, allowing you to hide useless controls depending on your needs.
- (3)Dynamic Menus the bottom of the Scene View will contain many items, depending on the active Operator and Visibility Buttons. Some of the contents in this areas may even change after some of user actions. Refer to each Operator documentation page to know more about this area.
Menu Layer
All buttons and controls are drawn on a specific Menu Layer. When the user mouse over buttons or control panels, Curved Poly will change its interaction state, in order to avoid conflicts with the Scene View. For example: you can't, accidentally, point on a vertex behind a control panel while you interact with the control panel. In order to make this clear, you will see that some in-scene controls change their appearance once you mouse over Menu items.
Common Visibility Settings
The following buttons are available on almost all Curved Poly operators (sometimes, they maybe uneffective, depending on user choices). The settings will change if you change view or operator; when you get back to an operator you have already used in a specific view, your previous settings will be restored. (That is: Curved Poly stores your settings both per Scene View and per Operator)
 Points: shows little white cubes at the position of vertex.
 Vertices: makes points interactive. When Points is selected
and Vertices is not, points are shown but can't be mouse clicked, even accidentally.
When Points is not selected, Vertices is ignored.
Vertices: makes points interactive. When Points is selected
and Vertices is not, points are shown but can't be mouse clicked, even accidentally.
When Points is not selected, Vertices is ignored.  Curves: like Points, shows curves as white lines.
 Edges: makes curved edges interactive. When Curves is selected
and Edges is not, curves are shown but can't be mouse clicked, even accidentally. When
Curves is not selected, Edges is ignored.
Edges: makes curved edges interactive. When Curves is selected
and Edges is not, curves are shown but can't be mouse clicked, even accidentally. When
Curves is not selected, Edges is ignored.  Normals: shows normals, both for vertices and for curves. Vertices
normals are not interactive. Edges normal are interactive.
Normals: shows normals, both for vertices and for curves. Vertices
normals are not interactive. Edges normal are interactive. Handles: shows handles, on vertices or on curves. Usually you
need to click on a vertex or on a curved to access its handles. Since each curved edge starts from a vertex, ends with another vertex and has two handles, one for each vertex, clicking on a curved edge will shows its two handles. Clicking on a vertex, will show one handle for each curved edges which uses that vertex on one of its extremes.
Handles: shows handles, on vertices or on curves. Usually you
need to click on a vertex or on a curved to access its handles. Since each curved edge starts from a vertex, ends with another vertex and has two handles, one for each vertex, clicking on a curved edge will shows its two handles. Clicking on a vertex, will show one handle for each curved edges which uses that vertex on one of its extremes. Handles Weight: when Handles is active and an handle is
selected, allows you to change that Handle weight, giving its curved edge a completely
different shape.
Handles Weight: when Handles is active and an handle is
selected, allows you to change that Handle weight, giving its curved edge a completely
different shape. Edge Hints: shows tessellation hints used by Curved Poly to control
tessellation algorithms.
Edge Hints: shows tessellation hints used by Curved Poly to control
tessellation algorithms. Polygons: shows a little quad at the center of each curved polygon
(this option availability may change according to other Operator settings). Polygons will still be visible as the computed mesh is always rendered apart from Curved Poly interface. If you wish to hide the mesh you need to go to Unity Inspector and uncheck the Mesh
Renderer.
Polygons: shows a little quad at the center of each curved polygon
(this option availability may change according to other Operator settings). Polygons will still be visible as the computed mesh is always rendered apart from Curved Poly interface. If you wish to hide the mesh you need to go to Unity Inspector and uncheck the Mesh
Renderer. Controls Behind Objects: deactives the z-test for all in-scene
Curved Poly controls, making them visible through the computed mesh. When off, a standard depth test is applied, which makes curves, points or polygons hiddens when they are behind the mesh.
Controls Behind Objects: deactives the z-test for all in-scene
Curved Poly controls, making them visible through the computed mesh. When off, a standard depth test is applied, which makes curves, points or polygons hiddens when they are behind the mesh. Horizontal
Position: move all visibility buttons to the top of the Scene View on a horizontal line
(for your convenience).
Horizontal
Position: move all visibility buttons to the top of the Scene View on a horizontal line
(for your convenience).
Common Menu Actions
Like other modeling softwares, Curved Poly allows you to select more elements (vertices, edges or faces) to work on them at the same time. The following menu actions are used to control which elements are selected; they are always available from any Operator (excluded the GameObjects Operator):
 Select All: Select all Edges, Polygons and Vertices. Activated
also by pressing S on the KeyBoard.
Select All: Select all Edges, Polygons and Vertices. Activated
also by pressing S on the KeyBoard. Unselect All: Unselect any selected Edge, Polygon or Vertex. Activated
also by pressing Shift+S on the KeyBoard.
Unselect All: Unselect any selected Edge, Polygon or Vertex. Activated
also by pressing Shift+S on the KeyBoard. Grow: extends the selection to any Edge, Polygon or Vertex being
nearby one the currently selected vertices. If you are in Pointing Operator and your selection is empty the selection will be extended starting from the last element clicked.
Grow: extends the selection to any Edge, Polygon or Vertex being
nearby one the currently selected vertices. If you are in Pointing Operator and your selection is empty the selection will be extended starting from the last element clicked. Grow Through Alignments: extends the selection to any edge being
aligned to one of the already selected edge (or, for Pointing Operator, to an edge which was previously clicked). It also selects any vertex at the extremes of each edge.
Grow Through Alignments: extends the selection to any edge being
aligned to one of the already selected edge (or, for Pointing Operator, to an edge which was previously clicked). It also selects any vertex at the extremes of each edge.  Grow Through Quads (new!): extends the selection from an edge
to its adjacent curved quads. The process is iterated more times if there are more successive quads forming a strip. An advice: the first time you try this, it's better if you select one edge at a time; then, after you have understood how it works, you may try more complex selections. This action is used to fast select strips of polygons through regular shapes like cylinders.
Grow Through Quads (new!): extends the selection from an edge
to its adjacent curved quads. The process is iterated more times if there are more successive quads forming a strip. An advice: the first time you try this, it's better if you select one edge at a time; then, after you have understood how it works, you may try more complex selections. This action is used to fast select strips of polygons through regular shapes like cylinders.  Extend to Edges: extends the selection to any Edge being nearby
one the currently selected vertices.If you are in Pointing Operators and your selection is empty the selection will be extended starting from you currently pointed element instead.
Extend to Edges: extends the selection to any Edge being nearby
one the currently selected vertices.If you are in Pointing Operators and your selection is empty the selection will be extended starting from you currently pointed element instead. Extend to Vertices: the selection to any Vertex being nearby one
the currently selected edges.If you are in Pointing Operators and your selection is empty the selection will be extended starting from you currently pointed element instead.
Extend to Vertices: the selection to any Vertex being nearby one
the currently selected edges.If you are in Pointing Operators and your selection is empty the selection will be extended starting from you currently pointed element instead. Extend to Polygons: extends the selection to any Polygon being
nearby one the currently selected edges or vertices.If you are in Pointing Operators and your selection is empty the selection will be extended starting from you currently pointed element instead.
Extend to Polygons: extends the selection to any Polygon being
nearby one the currently selected edges or vertices.If you are in Pointing Operators and your selection is empty the selection will be extended starting from you currently pointed element instead.
<< Prev Next >>