Curved Poly
Intro
General Features
version 1.3 News
about the Shadow Framework
Setup
How to Start
Editor Interface
Editor Windows
Tools Sets
Assets
Assets Worflow
Game Objects
Assets Upgrade to 1.3
Common Tools
Selection
Hiding and Visibility
Parts List
Shape Tools
Selection Transform
Backgrounds
Handles and Edges
Polygons
Shaping Options
Tessellation
LoDs Assets
Hints (A to P)
Composition Tools
Primitives
Custom Parts
Compositing
Materials Tools
Unwraps Tools
UV Panel
Advanced Shape Tools
Shape Edit Tools
Shapes Customization
Cutting and Splitting
Making Shapes
Exploiting other Tools
Issues and Fixing
Curves and Surfaces
Free Paths
Parametric Curves
Generating Surfaces
Update Surfaces
Assets Workflow

Fig. 1 Full Assets Workflow Diagram
There are more ways in which Curved Poly Editor stores data into
your project. The Assets workflow has been completely reworked, and significantly improved, in version 1.3, so, this section of our documentation is to be considered new also for people who have already experienced any previous version of Curved Poly. Let's start with the basics. Whereever you want to start modeling something, you could start with a premade shape. There are two main ways to do so: from Game Objects Tools, you can press ![]() Import and grab an Asset. In
this case the asset is imported as a copy of the original model. A game object is generated
in scene, with a Curved Poly Component. The Curved Poly Component has assigned an Asset whose name is none. This means that the model you cloned is stored within the Curved Poly component, which is part of the Scene, and it doesn't refer to any specific asset.
Import and grab an Asset. In
this case the asset is imported as a copy of the original model. A game object is generated
in scene, with a Curved Poly Component. The Curved Poly Component has assigned an Asset whose name is none. This means that the model you cloned is stored within the Curved Poly component, which is part of the Scene, and it doesn't refer to any specific asset.

Fig. 2 A Curved Poly Component with a None Asset assigned. All data will be store within the scene.
On the other side, you can use ![]() Load in place of Import.
Load does pretty much the same thing, with the huge difference that once a model is loaded, it's Curved Poly Component is directly referencing the original asset itself. This means that the model will not be saved in the scene. And that any change on the model will affect also the original asset, and every other object using it.
Load in place of Import.
Load does pretty much the same thing, with the huge difference that once a model is loaded, it's Curved Poly Component is directly referencing the original asset itself. This means that the model will not be saved in the scene. And that any change on the model will affect also the original asset, and every other object using it.
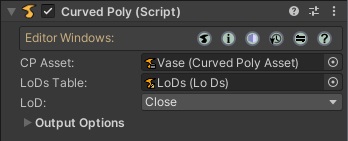
Fig. 3 A Curved Poly Component with an Asset assigned named Vase. The asset can be assigned to more objects, it is saved as part of the project and not in Scene and it is found in the Project Panel
So we have models stored in scene, and models stored in assets.
It is possible to create new Assets from both of them. Creating new assets is good since you can reuse them on more objects. Let's say we have made some changes to our model and we want to store the changes in a new asset. When we press ![]() Save,
a new asset is generated with a preassigned progressive name, but you can move it where you want, and rename it as you wish.
Save,
a new asset is generated with a preassigned progressive name, but you can move it where you want, and rename it as you wish.
When you select the asset in the project, the Inspector shows a preview of the model itself. Here we have a third way to add models to the scene, by clicking on Add to Scene. Add to Scene generates a new model with the same name of the Asset added, and the new object is referencing.

Fig. 4 A Curved Poly Asset Inspector. Pay attention to the two buttons, Add to Scene and Copy into Library.
Once the object using the asset is in scene, you may need to break
the link with the original asset. There are two ways to do so. We can press on ![]() Save Asset As New to
generate a new asset different from the first one. The new asset is now independet from the first one, and can be reshaped apart.
Save Asset As New to
generate a new asset different from the first one. The new asset is now independet from the first one, and can be reshaped apart.
Another possibility is to detach the asset from the object, with
![]() Detach
From Asset. In this way the asset is cloned on the Curved Poly Component, and the reference
on the Curved Poly Component becomes none, making the models to be stored in scene, rather as part of a Curved Poly Asset.
Detach
From Asset. In this way the asset is cloned on the Curved Poly Component, and the reference
on the Curved Poly Component becomes none, making the models to be stored in scene, rather as part of a Curved Poly Asset.
There's another important thing about Curved Poly Assets. They can be collected into libraries, making it easier to share them among more projects. In order to do so, we go on Project and press on Create, Curved Poly, Curved Poly Assets Library. This generates an empty library.
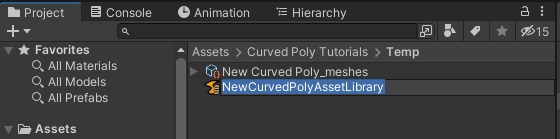
Fig. 5 A new Curved Poly Assets Library.
Now you can select one or more Assets, and there is a button in the inspector saying Copy into library. We click on Copy into library, and we can choose which is the library we want to send our objects to. The assets are copied into the library, so in this case we still need to decide if we need to keep the original assets, or if we wish to dispose of them and keep only the copy we made in the library.

Fig. 6 A Curved Poly Assets Library Inspector.
<< Prev Next >>