Curved Poly
Intro
General Features
version 1.3 News
about the Shadow Framework
Setup
How to Start
Editor Interface
Editor Windows
Tools Sets
Assets
Assets Worflow
Game Objects
Assets Upgrade to 1.3
Common Tools
Selection
Hiding and Visibility
Parts List
Shape Tools
Selection Transform
Backgrounds
Handles and Edges
Polygons
Shaping Options
Tessellation
LoDs Assets
Hints (A to P)
Composition Tools
Primitives
Custom Parts
Compositing
Materials Tools
Unwraps Tools
UV Panel
Advanced Shape Tools
Shape Edit Tools
Shapes Customization
Cutting and Splitting
Making Shapes
Exploiting other Tools
Issues and Fixing
Curves and Surfaces
Free Paths
Parametric Curves
Generating Surfaces
Update Surfaces
UV Panel
With the UV Panel it is possibile to edit and customize UV coordinates. In order to activate it, you need first to look for the UV Panel section of the dedicated inspector, and press on show.
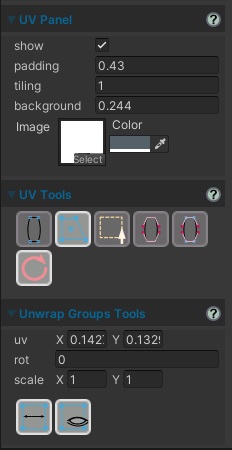
Fig. 1 UV Panel with show option activated.
UV Panel
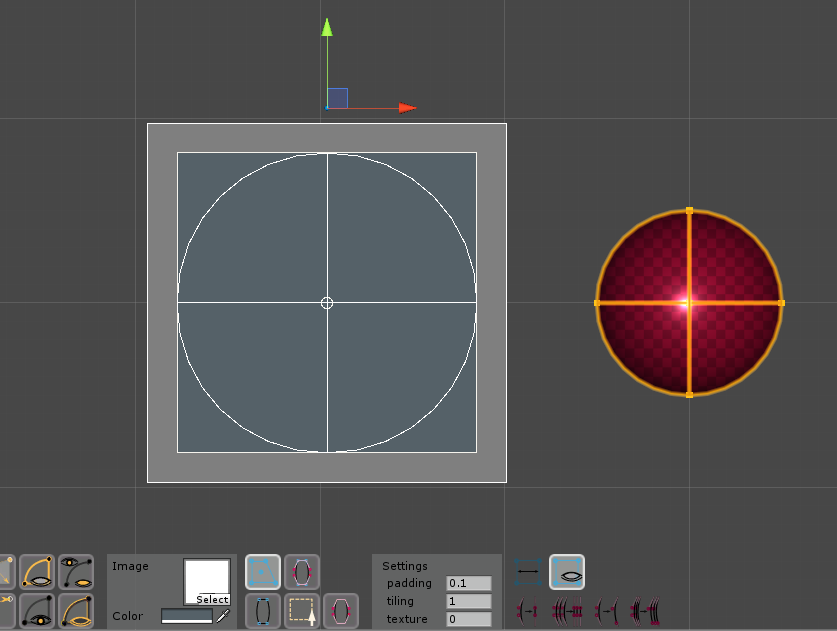
Fig. 2 UV Panel and Menus.
Curved Poly uses a uv panel which shows unwrapped uv coordinates and which is integrated in the Scene View (rather than being drawn on a separated window). Once you enter the UV Operator the panel will be placed somewhere on the left or on the right of your model, perfectly aligned with your camera. You can then move it, rotate it or scale the way you want using the Unity Transform Tools: in order to do so you may need to point (click) the little orange pivot over the top of the panel, but the pivot is already pointed by default when you first activate the operator (so, you will see directly the transform tools, and the little pivot will be visible only after you point something else)
The panel draws all the edges of the model using its uv coordinates. It also draws different other things depending on the selected mode, which can be:
 Transforms
Mode : gives you control over unwrap groups transforms. In this case Unwrap Transforms
Controls are drawn.
Transforms
Mode : gives you control over unwrap groups transforms. In this case Unwrap Transforms
Controls are drawn. Vertices
Mode : gives you control over uv coordinates of vertices. In this case, vertices are drawn
as blue squares.
Vertices
Mode : gives you control over uv coordinates of vertices. In this case, vertices are drawn
as blue squares. Handles
Mode : gives you control over uv coordinates of handles. In this case handles are drawn
as magenta squares.
Handles
Mode : gives you control over uv coordinates of handles. In this case handles are drawn
as magenta squares. Vertices
and Handles Mode : gives you control over uv coordinates of both handles and vertices.
Vertices
and Handles Mode : gives you control over uv coordinates of both handles and vertices. Selection
Mode : gives you control over uv coordinates of a group of selected vertices. You can't
select vertices in the UV Operator, but you can open a second scene view tab using a different operator to arrange a selection. Or you can switch to Selection Operator, make your selection and get back to UV Operator with a selection active.
Selection
Mode : gives you control over uv coordinates of a group of selected vertices. You can't
select vertices in the UV Operator, but you can open a second scene view tab using a different operator to arrange a selection. Or you can switch to Selection Operator, make your selection and get back to UV Operator with a selection active.
The Panel has a few parameters which can be used to customize your experience:
- Image: you can assign a texture to the panel background
- Color: a background color which is applied to the image if you have one selected.
- background (UV Panel Settings): controls the dimension of the background rendered inside the panel.
- padding (UV Panel Settings): the panel has a gray margin; this parameter controls the size of the padding around the background. Note: it's not a padding amount, its the final size of the most external quad in the panel. The editor will keep it higher than background, whatever you do (by, at least, an amount of 0.1).
- tiling (UV Panel Settings): a value applied to scale the texture within the background space. It has no effect if there is not a texture applied.
UV Operator and Geometry Inspector
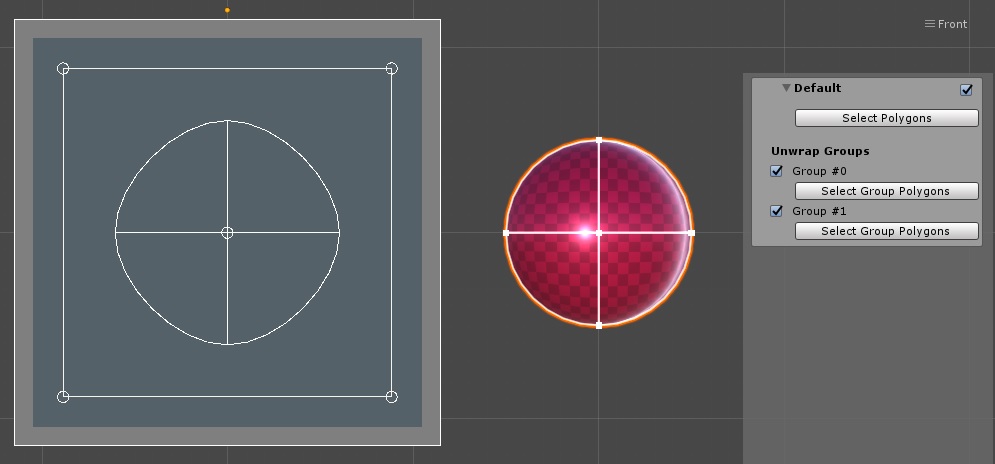
Fig. 3 Geometries Inspector for UV Operator.
This Operator has a Geometry inspector on the right. The inspector allows you to navigate the geometries (if your model has more than once), select which one to show on the UV Panel (UV Panel always shows one Geometry at a time) and filter Unwrap Groups you don't want to see. Each Geometry is presented as foldout panel, which, by default shows only the geometry name and a checkbox to select it. Opening the foldout will allow you to:
- Access the Select Polygons button which select all geometry polygons at once. It will also select the geometry itself if not selected (this can also be done by pressing the checkbox on top of the panel)
- See the list of Unwrap Groups. Unwrap Groups haven't a name, they are simply numbered. You can use the checkbox near the label Group #-# to control the visibility of the Group on the panel; this is useful if you want to edit more overlapping groups one by one on the panel. You have also access to one more Select Group Polygons button for each Group which allows you to select all the polygons in the group.
Editing Unwrap Groups Transforms
Fig. 4 Transform Mode.
Each Unwrap Group has a transform assigned which can be used to edit the position of all uv coordinates belonging to the group at once. Each transform is drawn as a quad on the UV Panel. The quad is a square, by default, the first time an Unwrap Group is generated, and than can change shape. You can edit:
- The four corners of the Transform Quad: point (click on the little circle) them to activate them and show the Transforms Tools. Use the Move Tool to change the position of the corner.
- The center of the Transform Quad: point (click on the little circle) it to activate it and show the Transforms Tools. Use the Move Tool to change the position of the center and therefore of all the corners at once. When you activate the center, you can also use the Rotate Group and the Scale Group, which will affect all the corners too: keep in mind that uv coordinates has only 2 components, and the third component is always set to zero, so any 3D rotation which would rotate points out of the Panel will result in a stretch instead.
In this mode you have access also to two instant actions:
 Reflect: Reflect a Transform Group from right to left. You need
first to point on one of its 4 corners or on the center. (There is no option to Reflect up to down, but you can reflect right to left and rotate the center by 180°for the same result)
Reflect: Reflect a Transform Group from right to left. You need
first to point on one of its 4 corners or on the center. (There is no option to Reflect up to down, but you can reflect right to left and rotate the center by 180°for the same result) Hide By Unwrap Group: Hide Polygons of hidden Unwrap Groups and
Un-Hide Polygons of Unwrap Groups which are not hidden. You need first to access the Geometries Inspector and choose which Unwrap Groups to hide. With this button you will get the groups hidden not only on the UVPanel but also on the model.
Hide By Unwrap Group: Hide Polygons of hidden Unwrap Groups and
Un-Hide Polygons of Unwrap Groups which are not hidden. You need first to access the Geometries Inspector and choose which Unwrap Groups to hide. With this button you will get the groups hidden not only on the UVPanel but also on the model.
(UV) Editing Vertices

Fig. 5 Vertices Mode.
In vertices Mode (or vertices and handles mode) you can change the position of each vertex uv coordinate one by one, using the Move Tool. Each main vertex is shown as a blue square. You need to point (click) the square to show the tool and start moving the vertex. Elasticities are not applied on the UV-Panel, but the handles will silently follow their vertex (like in Clayish mode).
Also: keep in mind that some vertices may belong to more than one unwrap groups at a time. That applies to all the vertices on the line through which the group is cut during unwrapping. Those vertices will have, consequentially, more than one uv coordinate, which can (have to) be edited one by one.
(UV) Editing Handles
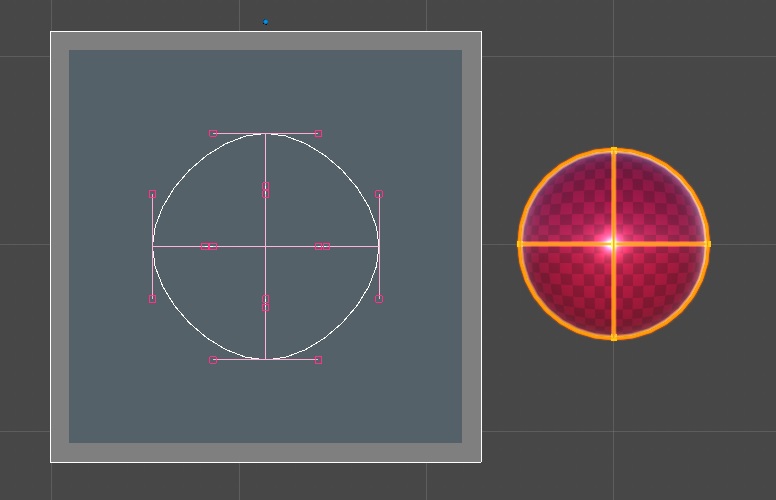
Fig. 6 Handles Mode.
In handles Mode (or vertices and handles mode) you can change the position of each handle uv coordinate one by one, using the Move Tool. Each handle is shown as a magenta square. You need to point (click) the square to show the tool and start moving the handle. Any aligned handle is moved as well.
As it happens for vertices, each handle may have more than one uv coordinate, up to two (when the handle belongs to an edge which has been cut during unwrapping processes)
With handles modes you also have access to the following instant actions:
 Simplify Edge: you need to point an handle uv-coordinate first.
This action will affect both the handles of the edge this handle belongs. This action will convert uv-coordinates for the handles so that the shape of the edge in uv space becomes an exact line. This is generally useful as an initial setup when you plan to manually edit the handles uv coordinates one by one with this tools.
Simplify Edge: you need to point an handle uv-coordinate first.
This action will affect both the handles of the edge this handle belongs. This action will convert uv-coordinates for the handles so that the shape of the edge in uv space becomes an exact line. This is generally useful as an initial setup when you plan to manually edit the handles uv coordinates one by one with this tools. Simplify All Uwrap Group Edges:you need to point an handle uv-coordinate
first. This action will affect the uv coordinates of all handles belonging to the same unwrap group of the selected one. This action works like Simplify
Edge but it simplifies the shape of all the edges in the group. This is generally useful
as an initial setup when you plan to make a custom unwrap by editing the handles uv coordinates one by one with this tools.
Simplify All Uwrap Group Edges:you need to point an handle uv-coordinate
first. This action will affect the uv coordinates of all handles belonging to the same unwrap group of the selected one. This action works like Simplify
Edge but it simplifies the shape of all the edges in the group. This is generally useful
as an initial setup when you plan to make a custom unwrap by editing the handles uv coordinates one by one with this tools.
 Arc Length Edge: you need to point an handle uv-coordinate first.
This action will affect both the handles of the edge this handle belongs. This action will relocate each handle uv-coordinate in order to better redistribute the relative positions of uv coordinates across the edge in the 3D space. This is performed by taking measures of the 3D shape of the edge and use that measures to recompute distances within the edge. This may be a good thing to do on each edge after you have finished moving its handles uv coordinates.
Arc Length Edge: you need to point an handle uv-coordinate first.
This action will affect both the handles of the edge this handle belongs. This action will relocate each handle uv-coordinate in order to better redistribute the relative positions of uv coordinates across the edge in the 3D space. This is performed by taking measures of the 3D shape of the edge and use that measures to recompute distances within the edge. This may be a good thing to do on each edge after you have finished moving its handles uv coordinates. Arc Length All Uwrap Group Edges: you need to point an handle
uv-coordinate first. This action will affect the uv coordinates of all handles belonging to the same unwrap group of the selected one. This action will relocate each handle uv-coordinate in order to better redistribute the relative positions of texel across all the edges of the unwrap group in the 3D space. This is performed by taking measures of the 3D shape of each edge and use that measures to recompute distances within each edge. This
may be a good thing to do at the end of any manual editing of uv coordinates of a model.
Arc Length All Uwrap Group Edges: you need to point an handle
uv-coordinate first. This action will affect the uv coordinates of all handles belonging to the same unwrap group of the selected one. This action will relocate each handle uv-coordinate in order to better redistribute the relative positions of texel across all the edges of the unwrap group in the 3D space. This is performed by taking measures of the 3D shape of each edge and use that measures to recompute distances within each edge. This
may be a good thing to do at the end of any manual editing of uv coordinates of a model.
 (UV) Editing Selections
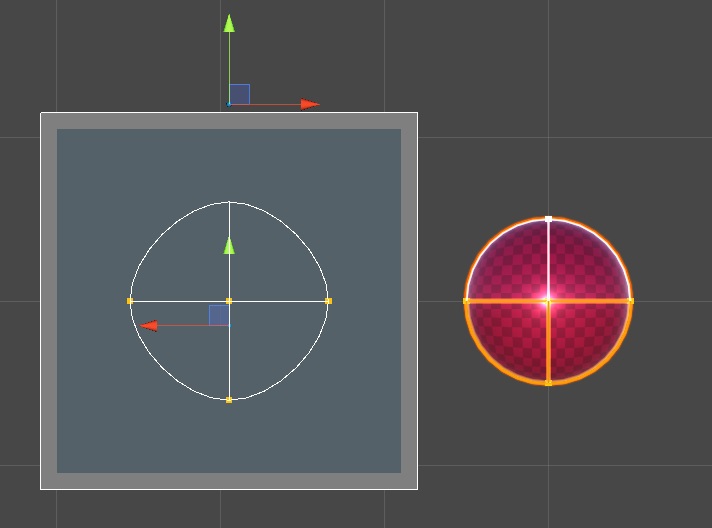
Fig. 7 Selection Mode.
In Selection Mode you can edit more uv coordinates at once. In order to do so, you need to select a group of vertices with any other tool, then on the UV Panel you can use transform tools to Move, Rotate or Scale all uv coordinates of all selected vertices at once.
That said: you must pay much attention when you select a vertex with more than one uv-coordinate, because all its uv coordinates will be selected at once (we are going to work on this in future, giving you the option to select which uv-coordinates you want to transform). There are many practical situations in which this make sense, but there are also situations in which this should be avoid. When selecting such vertices does not work, you should rather edit them in vertex mode.
<< Prev Next >>