Curved Poly
Intro
General Features
version 1.3 News
about the Shadow Framework
Setup
How to Start
Editor Interface
Editor Windows
Tools Sets
Assets
Assets Worflow
Game Objects
Assets Upgrade to 1.3
Common Tools
Selection
Hiding and Visibility
Parts List
Shape Tools
Selection Transform
Backgrounds
Handles and Edges
Polygons
Shaping Options
Tessellation
LoDs Assets
Hints (A to P)
Composition Tools
Primitives
Custom Parts
Compositing
Materials Tools
Unwraps Tools
UV Panel
Advanced Shape Tools
Shape Edit Tools
Shapes Customization
Cutting and Splitting
Making Shapes
Exploiting other Tools
Issues and Fixing
Curves and Surfaces
Free Paths
Parametric Curves
Generating Surfaces
Update Surfaces
Handles and Edges
Handles are used to give shape to edges. Each curved edge has two vertices, and for each vertex it has two handles. Handles are not directly shown on the model, because you need to pick first a vertex or an edge to have access to their related handles.
So in order to pick and handle, we need first to have the handles visibility option active. We also need to be either in Vertex Mode or Edges Mode. For instance, id we are in Vertex Mode we can pick a vertex first and then we can pick one of its related handles.

Fig. 1 Picking a vertex makes its related handles accessible.
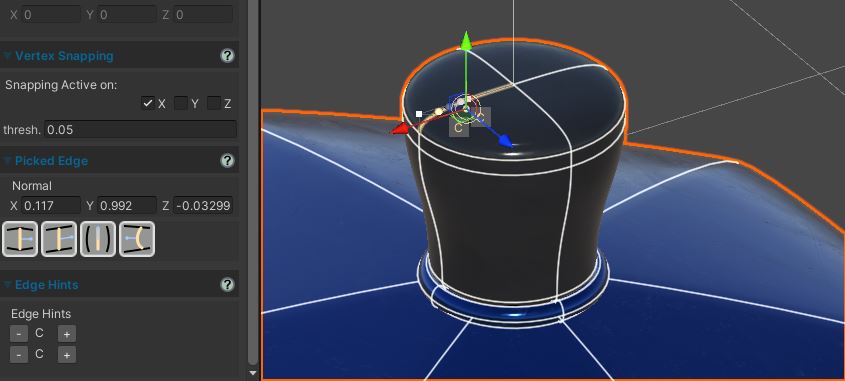
Fig. 2 A Picked Edge gives access to its two handles.
A picked handle is rendered as a set of 3 arrows. On the dedicated
inspector a section appears about the handle, called Picked Handle. From this section
we can pick back the vertex attached to the handle with ![]() Back to Vertex.
So, pick again the handle. We can also pick the edge it belongs with
Back to Vertex.
So, pick again the handle. We can also pick the edge it belongs with ![]() Back to Edge.
Handles are visible only when their edges or vertices are picked, so you need to use the
Back to Edge.
Handles are visible only when their edges or vertices are picked, so you need to use the ![]() Pick
Tool to access them. Back to vertex and Back to Edges can be used to navigate the model,
and to investigate the exact relationships between elements in the model.
Pick
Tool to access them. Back to vertex and Back to Edges can be used to navigate the model,
and to investigate the exact relationships between elements in the model.
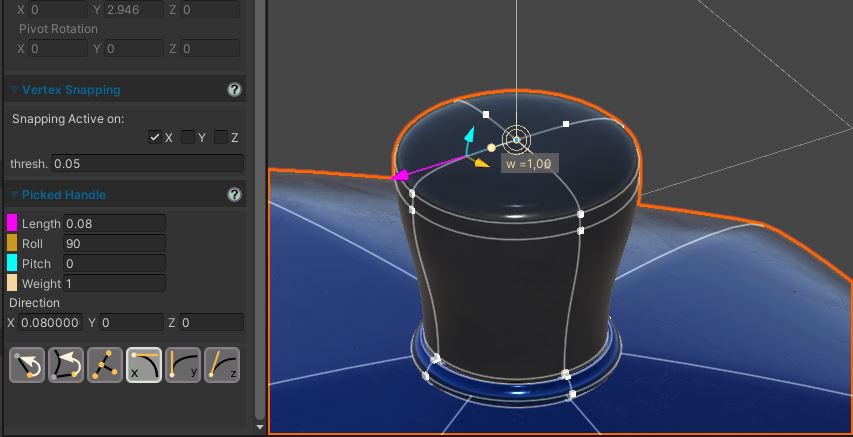
Fig. 3 Once an handle is picked, its Dedicated Inspector section (on the left) is shown. You can exploit Back to Edge and Back to Vertex to navigate the continuum of edges and vertices through their edges.
There are two kind of handles in Curved Poly: free handles and constrained handles. We will start with constrained handles, since they are the most common. A constrained handle has a magenta, yellow and cyan arrows where the yellow and cyan arrows have a circular shape.
Such handles are constrained, as all the handles on their vertices, because that vertices are smooth. In order to keep the smoothness, all the handles must lay on the same plane. This plane is defined by a vertex editing normal, which is drawn on top of the vertex. So, about the three handles. The magenta handle controls the distance from the vertex. When you use this, the handle keeps constrained to the plane, so the length handle doesn't affect the other handles. The yellow arrow is called the roll of the handle. It controls how much the handle rotates around the editing normal. So, again, when you change the roll, the handles keep being on the same plane, and its position doens't affect the smoothness plane, neither the editing normal on the vertex, or the other handles. The cyan arrow is the pitch. It makes the handle rotate in a way which force the whole editing plane to rotate together with the handle, in this sense affecting both the editing normal on the vertex, and the other handles.
Handles have also a Weight parameter. This parameters affects the shape of the curve without changing the actual handle. If you are familiar with weighted curves, from other modeling tools, you should how it works. If you are not, let's say that the more the weight is high, the more the curves is dragged towards the handle. The less is the weight, the less the curve is attracted by the handle. You may try it a bit on your own to understand this.
Below the parameters controls, the Dedicated Inspector expose this actions:
 Back to Vertex
, this Button to activate the vertex this handle refer to. It is useful in situations in which
you have much stuff in the scene, or too many controls on the object, and you find hard to access the vertex.
Back to Vertex
, this Button to activate the vertex this handle refer to. It is useful in situations in which
you have much stuff in the scene, or too many controls on the object, and you find hard to access the vertex. Back to Edge
, Press this Button to activate the edge this handle belongs to. It is useful in situations
in which you have much stuff in the scene, or too many controls on the object.
Back to Edge
, Press this Button to activate the edge this handle belongs to. It is useful in situations
in which you have much stuff in the scene, or too many controls on the object. Center Handle
, Correct the Roll Value of the Handle, so that it becomes centered with respect of the two
other handles it has on its left and right. If the two handles are aligned, the centered handle will have an exact 90° angle with both them.
Center Handle
, Correct the Roll Value of the Handle, so that it becomes centered with respect of the two
other handles it has on its left and right. If the two handles are aligned, the centered handle will have an exact 90° angle with both them.

 X-Y-Z Handle Directions
, correct the direction of the handle by aligning it to the x, y, z directions. Left-Right
(X Button), Up-Down (Y Button), Backward-Forward (Z Button) directions are respectively chosen depending on the current direction. Such correction will affect only the Roll Value. Note: the software will keep always a 90° angle with the Editing Normal during this changes in order to keep the whole surface smooth. If the x,y or z directions are not on 90° with the normal, the handle direction will be correct to the closest direction available satisfying such constraint.
X-Y-Z Handle Directions
, correct the direction of the handle by aligning it to the x, y, z directions. Left-Right
(X Button), Up-Down (Y Button), Backward-Forward (Z Button) directions are respectively chosen depending on the current direction. Such correction will affect only the Roll Value. Note: the software will keep always a 90° angle with the Editing Normal during this changes in order to keep the whole surface smooth. If the x,y or z directions are not on 90° with the normal, the handle direction will be correct to the closest direction available satisfying such constraint.
Thery often, two handles are aligned together. This alignment ar part of the structure of the handles, and can be added or removed only with Editing Tools, in the process of making custom primitives. When you are in Shape Tools, you can see if two handles are aligned by looking form a blue handle. For instance here we have picked an handle, and on the same vertex, opposite to it, there is a blue handle. The blue handle is aligned with the one we have picked. An aligned handle is affected not only by the pitch of the picked handles ... but also by the roll. So they will rotate together around the vertex, keeping aligned one with the other. Again, the length arrow and the weight control do not affect the aligned handle.
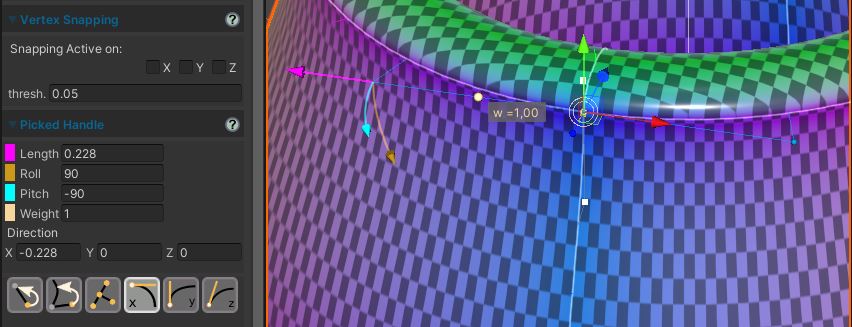
Fig. 4 A Couple of Aligned Handles. The one left is Picked, the one on the right has a different appearance from the others on the same vertex. Instead of a white square, it's a blue sphere, and the line connecting it to their common owner vertex is also blue. Changing the roll on the picked handle, will change also the roll of the aligned handle, so that they keep being on the same direction.
In the inspector you can find also some more tools to control the handles direction. The direction of the handle is the x, y, and z, of the vector going from the vertex to the handle. You can directly assign it here, but be aware that using the direction controls will affect the roll, pitch and length at once in more complex ways. One useful instrument here is the Center Handle. With the center handle you can force the roll in way that makes the handle centered, with respect to the two other handles on the left and on the right. If the two handles on the left and on the right are aligned, this will surely put the picked handle at 90 degrees with both of them. Pay attention to this exact configuration shown here: vertices with four handles, and with four polygons, and four edges, where the polygons has a 90 degree corner on each side of the vertex, are the best. On this conditions all the algorithms used to shape the polygons works at their best, making the shape of the model being smooth across edges, as intended. We are going to discuss this better in no time.
Before going on, let's have a look on free handles. One possible situation in which handles are free is when a vertex is marked as sharp. Sharp vertices are the ones represented with an empty square. Again, you can decide which vertices are sharp with the Editing Tools. Handles of sharp edges are not constrained. Here the editing normal on the vertex is less relevant, still important though for a few processes used in other tools sets. For free handles the dedicated inspector looks the same, but the roll and pitch arrows are not in scene. Here we are rather free to change the direction of the handle with a simple move tool. Of course, it is intended, when you change a free handle, sharp features mat appear on the model or not, depending on how you place the handle.
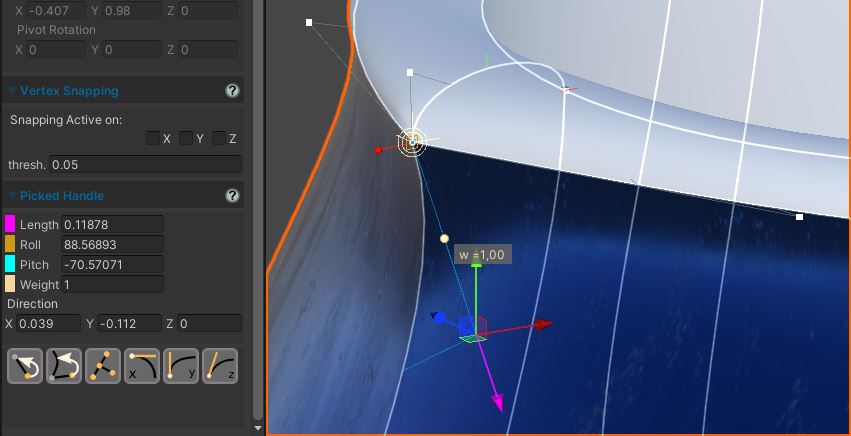
Fig. 5 A free handle has a different appearance. In order to have a free handle, its owner vertex has been made sharp. In this case you can freely move the handle, breaking the smoothness on the owner vertex, making the owner vertex, and its adjacent edges, sharp. Vertices can be made sharp with Edit Tools, or may be already sharp on some premade models or primitives. If you are looking for an example of primitive with sharp vertices and Curved Edges, you could try the Cube1x.
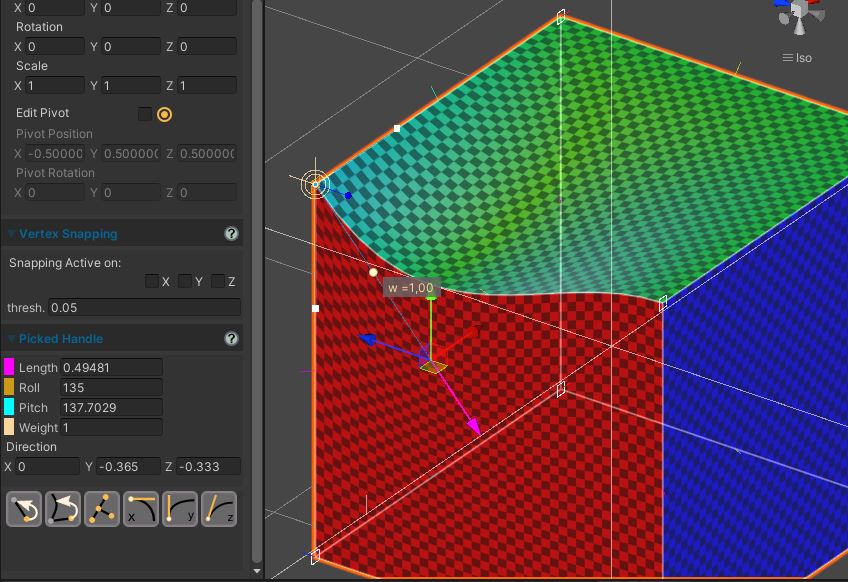
Fig. 6 A Reshaped Cube1x Primitive. This is an optimal example to see how handles work on sharp vertices.
Ok, now let's talk about the edges. We can pick an edge with pick tool, in edge mode. Similarly to vertices, curved edges as an important parameter called editing normal. The editing normals controls how the shape of the model must bend across the edge. We can change it to actually change the shape of the two polygons on the two sides of the edge.
Fig. 7 A Picked Edge with its Dedicated Inspector.
Pay attention, because any change to the handles of the curve
or to its vertices, may affect the editing normal on the edge. If the shape of polygons looks messy, you can reset the editing normal on the edge in many ways. For instance, there are 4 different tools here in the dedicated inspector; they works with different mathmatical strategies, but i'm not going to discuss that here. Usually the best is ![]() Axis Normals, or alse
Axis Normals, or alse ![]() Edge
Normal. That said, your are free to try all of them and choose which one looks better.
Edge
Normal. That said, your are free to try all of them and choose which one looks better.
<< Prev Next >>