Curved Poly
Intro
General Features
version 1.3 News
about the Shadow Framework
Setup
How to Start
Editor Interface
Editor Windows
Tools Sets
Assets
Assets Worflow
Game Objects
Assets Upgrade to 1.3
Common Tools
Selection
Hiding and Visibility
Parts List
Shape Tools
Selection Transform
Backgrounds
Handles and Edges
Polygons
Shaping Options
Tessellation
LoDs Assets
Hints (A to P)
Composition Tools
Primitives
Custom Parts
Compositing
Materials Tools
Unwraps Tools
UV Panel
Advanced Shape Tools
Shape Edit Tools
Shapes Customization
Cutting and Splitting
Making Shapes
Exploiting other Tools
Issues and Fixing
Curves and Surfaces
Free Paths
Parametric Curves
Generating Surfaces
Update Surfaces
Unwraps Tools
Unwrap Functions are tools which can be used to automatically generate uv coordinates (unwraps) for your needs. The general way to use the tool should always follow this steps.
- (A)Activate a Part : you can do this with the Parts List, or with the parts inspector, or even using Parts Selection Mode and clicking directly on the part you wish to activate.
- (B)Select a Group of Polygons : you can do this using the common tools, but be aware that only polygons belonging to the actually active part will be affected. You can still select other polygons using actions like Select All or Grow, but the tool will only affect selected polygons belonging to the active part.
- (C)Choose an Unwrap Function : when you select a function, an instance of it will be added. The function will generate one or more unwrap groups, using the polygons you have selected in a way which depends on the function.
- (D)Fix the Unwrap Function parameters : an Unwrap Function has many parameters, which can be controlled after you have generated it. You can find them in a dedicated section in the Dedicated Inspector. You may change and recall (reset) the Unwrap Function and its parameters more times before achieving a good unwrap or an unwrap which can be a good starting point before moving to the UV Panel.
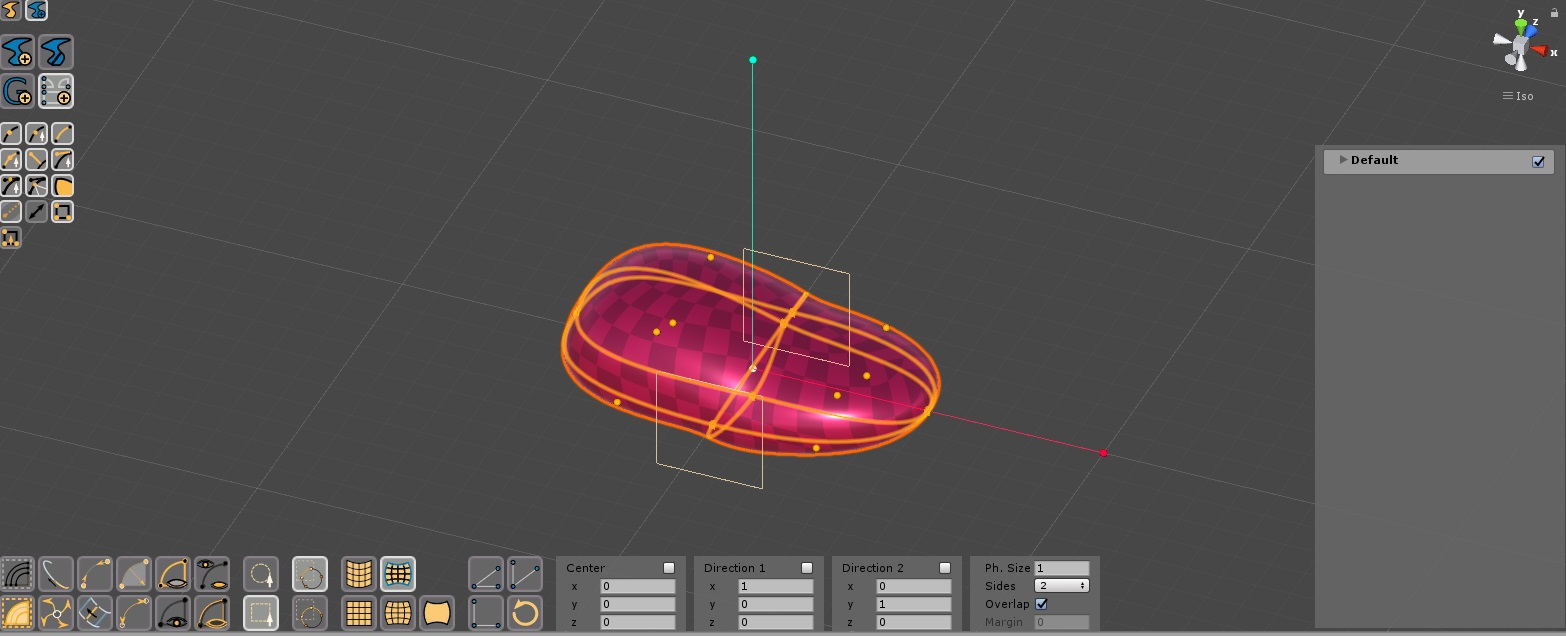
Fig. 1 The Unwraps Tools at work (The image here was taken in version 1.1 of Curved Poly, the editor inerface is changed but the Unwrap Tools are almost the same).
While making Unwrap Groups with Unwrap Functions, you should always keep in mind that:
- A Part can have one or more Unwrap Groups.
- A Part can have one or more Unwrap Functions.
- An Unwrap Function can generate one or more more Unwrap Groups. The total of the Unwrap Groups in the Part is the sum of Unwrap Groups generated by its functions.
So: there is a hierarchy involving Parts, U.Groups and U.Functions. You may find it a bit complex at the beginning, but you will find it pretty practical once you have used it a few times, especially because Unwrap Functions can be assigned and modified only in Materials Tools Set and they don't affect any other Tools Set. They exist only to make it easier the generation of Unwraps Groups. The key point here is that you can have more Functions for the same Part so that you can cut the part into different subparts to apply a different unwrap function to each subpart, and this is very important when you need to unwrap complex parts made of a lot of polygons and with irregular shapes.
There are 6 available unwrap functions:
 Planar Unwrap (Bisided): Generates uv coordinates mapping 3D coordinates
on a plane. It is bisided, meaning that by default it will generate 2 Unwrap Groups, splitting the model into two halves watching the two sides of the plane. You can set it to 4 or 6 sides, to get 4 or 6 Unwrap Groups generated by cutting the model with respectively 2 or 3 planes.
Planar Unwrap (Bisided): Generates uv coordinates mapping 3D coordinates
on a plane. It is bisided, meaning that by default it will generate 2 Unwrap Groups, splitting the model into two halves watching the two sides of the plane. You can set it to 4 or 6 sides, to get 4 or 6 Unwrap Groups generated by cutting the model with respectively 2 or 3 planes.  Cylinder Unwrap: Generates uv coordinates mapping 3D coordinates
on a cylinder. By default it will generate 2 Unwrap Groups, splitting the model into two halves watching the two sides of a reference plane containing the axis of the cylinder.
Cylinder Unwrap: Generates uv coordinates mapping 3D coordinates
on a cylinder. By default it will generate 2 Unwrap Groups, splitting the model into two halves watching the two sides of a reference plane containing the axis of the cylinder.  Spherical Unwrap: Generates uv coordinates mapping 3D coordinates
on a sphere. By default it will generate 2 Unwrap Groups, splitting the model into two halves watching the two sides of a reference plane passing through the center of the sphere.
Spherical Unwrap: Generates uv coordinates mapping 3D coordinates
on a sphere. By default it will generate 2 Unwrap Groups, splitting the model into two halves watching the two sides of a reference plane passing through the center of the sphere.  Physical Unwrap: This is an experimental function. It is
an improved version of Planar Unwrap Bisided which takes into account the arc length of edges in 3D space to improve the edge shape in uv space.
Physical Unwrap: This is an experimental function. It is
an improved version of Planar Unwrap Bisided which takes into account the arc length of edges in 3D space to improve the edge shape in uv space. Edge Length Unwrap: is is planned to become a better version of
physicalunwrap, but it's still experimental. This does its best to keep a proportion among the length of edges.
Edge Length Unwrap: is is planned to become a better version of
physicalunwrap, but it's still experimental. This does its best to keep a proportion among the length of edges. Empty Unwrap: An Unwrap which doesn't assigne values, generating
only one Unwrap Group. It's the default function for imported parts or parts generated with the Create
Operator. If you press the button, you will get an unwrap with all uv coordinates assigned
to 0 (zero).
Empty Unwrap: An Unwrap which doesn't assigne values, generating
only one Unwrap Group. It's the default function for imported parts or parts generated with the Create
Operator. If you press the button, you will get an unwrap with all uv coordinates assigned
to 0 (zero).
Unwrap Functions Parameters
The most important parameters of a Function are its center and reference directions, which are used to control cutting planes. This parameters can be edited directly on a set of Handles which appears in the scene view: a white sphere is the center; a red line ending with a sphere is the first direction, and a green line ending with a sphere is the second direction. You can point on a sphere to access a Move Tool to change its position. Around the frame made by the two directions you will see 2 (or more) yellow quads showing the sides of the unwrap functions, that is the reference used during the generation of each unwrap group. These parameters can be changed also with a menu. All these controls are available only after a Function has been generated or selected (to select a function, you need to look for it in the in-scene Parts Inspector on the right).
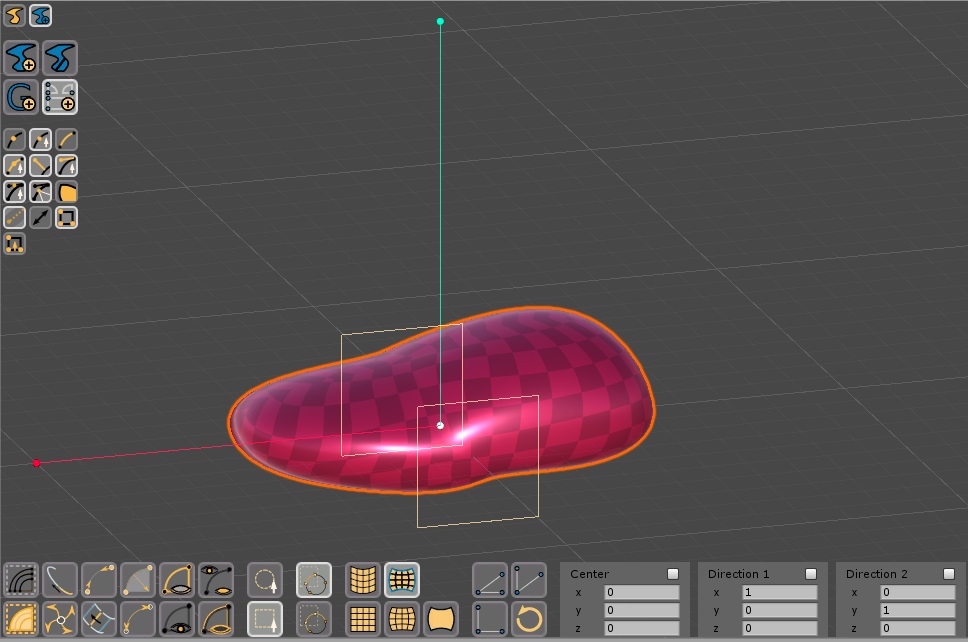
Fig. 2 The Unwraps Frame (center, directions and planes). Here other graphical elements visibility has been disabled. (The image here was taken in version 1.1 of Curved Poly, the editor inerface is changed but the Unwrap Tools are almost the same)
Other parameters are:
- Physical Size: this parameter controls the rapport between distances in 3D space
and distances in uv space. This rapport can't be applied perfectly on unwrapped curved surfaces (this is a classical problem of unwrapping), but each unwrap function will work to do its best to get close to it. Physical Unwrap has been designed to match Physical Size better than the others.
- Sides: this parameter controls amount of Unwrap Groups generated by the function.
- Overlap: this parameter controls the way the unwrap groups are placed in uv space If true, the groups will be overlapped, otherwise they will be placed at different position in uv-space.
- Margin: this parameter is available only when overlap is false. It controls the spacing between adjacent groups placed at different position in uv space.
Most of these parameters will not affect directly the function until you Reset the Unwrap with one of this actions:
- Click on
any Unwrap Function: You can change the unwrap function. The new function will keep your
parameters assignment, then will recompute the Unwrap.
 Reset
Unwrap: recompute the unwrap taking into account any updated parameter in the Function.
Reset
Unwrap: recompute the unwrap taking into account any updated parameter in the Function. Unwrap Frame on XY: set the Unwrap Frame so that its directions
become the x and y axis, than it recomputes the unwrap.
Unwrap Frame on XY: set the Unwrap Frame so that its directions
become the x and y axis, than it recomputes the unwrap. Unwrap Frame on XZ: set the Unwrap Frame so that its directions
become the x and z axis, than it recomputes the unwrap.
Unwrap Frame on XZ: set the Unwrap Frame so that its directions
become the x and z axis, than it recomputes the unwrap. Unwrap Frame on ZX: set the Unwrap Frame so that its directions
become the y and z axis, than it recomputes the unwrap.
Unwrap Frame on ZX: set the Unwrap Frame so that its directions
become the y and z axis, than it recomputes the unwrap.
Keeping control other Unwrap Functions
There are a few things you can do to control your unwrap functions.
- After you create a new Unwrap Function: the Tools Set will continue working on that function, until you change your polygons selection. While the function is active, you will be able to change its parameters and even change the function type itself. All the groups for that function will be regenerated with your new function type and parameters.
- If you select a polygon which was previously unwrapped for a new unwrap function: it will be removed from the previous Unwrap Function, since each polygon can belong only to one unwrap function at a time. Eventually empty functions and groups will be removed from the part.
- If you select all polygons and create a new function: all polygons will be moved to the new function, so all previously generated functions and groups will be removed from the part (you can always Undo things). This is usefull if you want to remove all the unwraps or restart from scratch
- When generating a Function you don't have to select all polygons: select the ones you want to unwrap now with a specific function, you will be able to apply a second function on the other ones.
- When you want to load back a function to change some of its parameters: you can do this by pressing its Select Function button in the Parts Inspector.
<< Prev Next >>