Curved Poly
Intro
General Features
version 1.3 News
about the Shadow Framework
Setup
How to Start
Editor Interface
Editor Windows
Tools Sets
Assets
Assets Worflow
Game Objects
Assets Upgrade to 1.3
Common Tools
Selection
Hiding and Visibility
Parts List
Shape Tools
Selection Transform
Backgrounds
Handles and Edges
Polygons
Shaping Options
Tessellation
LoDs Assets
Hints (A to P)
Composition Tools
Primitives
Custom Parts
Compositing
Materials Tools
Unwraps Tools
UV Panel
Advanced Shape Tools
Shape Edit Tools
Shapes Customization
Cutting and Splitting
Making Shapes
Exploiting other Tools
Issues and Fixing
Curves and Surfaces
Free Paths
Parametric Curves
Generating Surfaces
Update Surfaces
Game Objects
To add a curved poly model in scene, you need to have a Curved Poly component active on one of your game objects. As we have seen, this can be done with Game Objects Tools from Curved Poly Editor. Or, it can be done by creating a new Curved Poly with Create Other, Curved Poly, New Curved Poly. Adding a Curved Poly component adds a Mesh Renderer, used to render the mesh generated by curved poly. There is also an hidden mesh Filter added; the Mesh Filter is hidden since you cannot assign a mesh to it. Curved Poly will use it to assign the proper mesh to your model. The Mesh Filter is still accessible by code in case you need it.
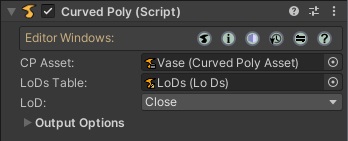
Fig. 1 A Curved Poly Component.
The Curved Poly Component has three important parameters: the first one is the Asset used (CP Asset:), which may be unassigned, or None, meaning that the model is stored in scene, rather than being stored in a shared asset. For instance we can drag and drop here a Curved Poly Asset. And we can remove the Asset again to remove the reference. Again, in this case we have created a perfect copy of the original asset, which will be saved withing the scene.
The second parameter is the Levels of Details table(LoDs Table:), that is the table which describes the Leveld of Details which can be used on the model. LoDs table can be customized, and we are going to show this in a later section, but for the rest of this presentation we are going to keep using the default LoDs asset.
And the third parameter here is the exact LoD choosen (LoD:), which must be one of the LoDs available in the table. As you can easily check on your own, changing the LoDs will upgrade the model with a different amount of polygons.
The component has also some advanced tools in the Output Options sections. In order to understand this section, keep in mind that Curved Poly Models are not exactly visible in scene. What you can see here is a regular Mesh which is generated by Curved Poly. These output options define how the Mesh is generated.
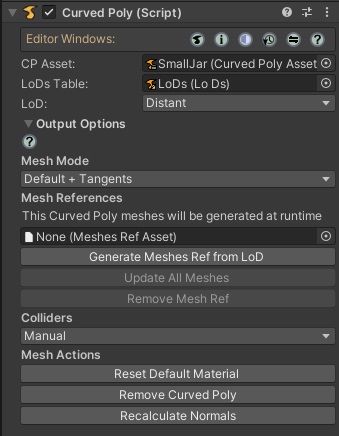
Fig. 2 Full Curved Poly Component Inspector.
The first control is the Mesh Mode. This defines which mesh data are going to be generated from the model. By default it should be set to Default plus tangents. In version 1.0 of Curved Poly tangents were not generated on the model, so if you select Default you are going to miss tangents. With no UV the mesh will be missing both uvs and tangents. In version 1.1 we had added an option to generate automaticcally uv2, but recently Unity has added some similar automation which integrates well with Curved Poly, and you don't need this any more. Use this if you are using Curved Poly on a Unity version previous to 2019 I say, and you need uv2.
Talking about integration with other plugins and tools, you should consider to use Mesh References in some situations. Indeed, by default Curved Poly generates Meshes at runtime. Since the meshes are generated at runtime, there is no way to feed them to other plugins or components you use in the editor, but you can do that using scripts. In case you can't do your own scripts, Mesh References are your best option. When we press on Generate Meshes Ref from LoD, we are asked to place a new asset somewhere in the project. The asset will contain a set of Regular Unity Meshes, one for each LoDs, which can be used everywhere in the project. While the link between the Meshes Ref Asset and the CurvedPoly component is active, any update to the model will be applied to the mesh matching the assigned LoD, and Curved Poly will keep using the meshes in the asset even in play mode, upgrading them when necessary. There is also the option to Update all the Meshes at once. It is also possibile to remove the Mesh Ref from the Curved Poly Component. In this case the Meshes Ref Assets will keep being in the project, but the meshes will not be updated any more.
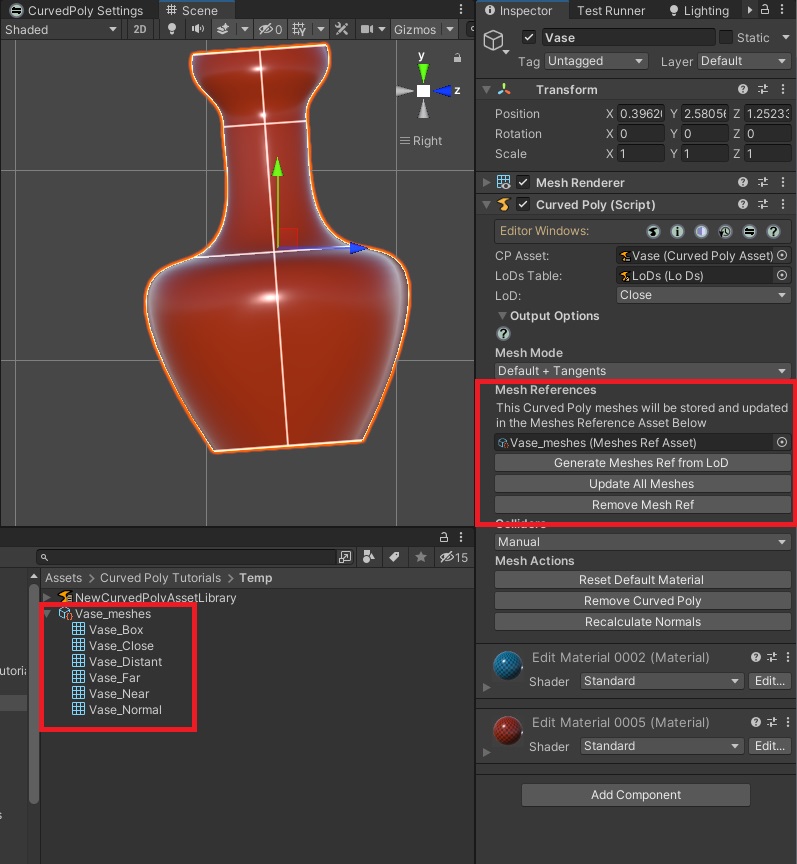
Fig. 3 A Meshes Reference Asset applied to Curved Poly Component.
Then, below here, we have the Colliders options. This is interesting only in case you are using a Collider on the same GameObject, and you want to make changes to the CurvedPoly Asset at runtime. In this case, Curved Poly can indeed update the parameters of the Collider at run time. For Mesh Colliders, the collider mesh will be assigned by choosing one of the available LoDs on the same model. So, playing with LoDs we can generate a very details model with a more simplified shape in its collider. Both the model and the and the Collider mesh can be updated if you change the asset on the model at runtime.
Again, below colliders we have a few mesh actions. We have already seen that we can rest a model to Curved Poly Default Material here in once click. We can also remove the Curved Poly Component. In this case a visible Mesh Filter will replace the model, with a Mesh assigned which depends on the last LoD which were selected on the model before removing Curved Poly Component.
Before removing a Curved Poly, or before detaching a Meshes Ref, it may be useful to recompute normals. What it happens here, is that Curved Poly uses Unity recompute normals algorithm to change the normals. This is usually a downgrade, since Curved Poly normals are generated on Curved Poly data, rather than Mesh Data, and therefore are more precise. That said, we may have specific situations in which Unity Normals are better than Curved Poly normals. Keep in mind that any change to the model will use again Curved Poly algorithms to compute normals, so this is an action which make sense only if you are going to Remove Curved Poly Component or Remove a Mesh Ref asset from it, because in that cases you will get a mesh which is not affected by Curved Poly any more.
Let's say we have already open the Editor and the Dedicated Inspector, and shown in the previous section. From Game Objects Tools, we can overview a few more tools related to a Curved Poly Components. This sections were previously part of of the main Curved Poly Inspector, but we moved them here to make it a bit more simple.
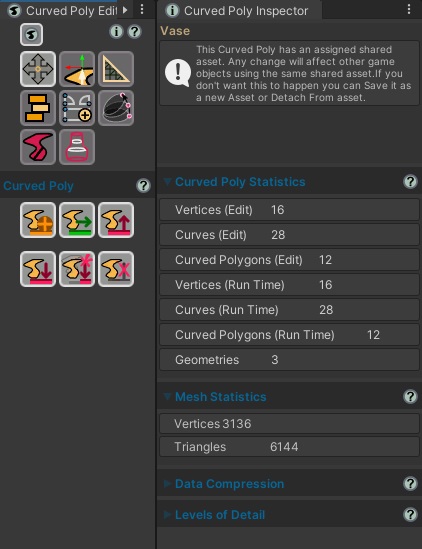
Fig. 4 Game Objects Dedicated Inspector - Statistics.
Here you can find a few statistics about the model, and about the mesh generated from the model. There is also the option to overview the Levels of Detail used on the model, which can be changed here: but keep in mind that any change here will affect any model using the same LoDs asset. We also suggest to avoid making changes on the original default LoDs asset, where you can create a new custom LoDs, or clone the default one, if you need to make changes.
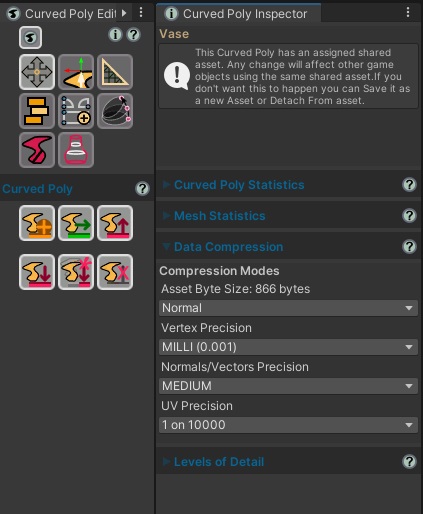
Fig. 5 Game Objects Dedicated Inspector - Data Compression.
Last but not least, we have a Data Compression Section. Here you can work on parameters which define how data is compressed in Curved Poly models. Indeed, vertices, normals and uvs can be saved with different resolution. Increasing the resolution, increase the precision but also increases the size of the asset. Take for instance the Vertex Precision: this allows you to define the resolution used to save vertices coordinates, where the default MILLI stays for one milli part of the Unit, which for most real curved poly models is pretty much enough. The default settings are usually fair enough, but in case you fill you need more precision, you can refer to the inline docs which explain better the meaning of each parameter.
<< Prev Next >>