Curved Poly
Intro
General Features
version 1.3 News
about the Shadow Framework
Setup
How to Start
Editor Interface
Editor Windows
Tools Sets
Assets
Assets Worflow
Game Objects
Assets Upgrade to 1.3
Common Tools
Selection
Hiding and Visibility
Parts List
Shape Tools
Selection Transform
Backgrounds
Handles and Edges
Polygons
Shaping Options
Tessellation
LoDs Assets
Hints (A to P)
Composition Tools
Primitives
Custom Parts
Compositing
Materials Tools
Unwraps Tools
UV Panel
Advanced Shape Tools
Shape Edit Tools
Shapes Customization
Cutting and Splitting
Making Shapes
Exploiting other Tools
Issues and Fixing
Curves and Surfaces
Free Paths
Parametric Curves
Generating Surfaces
Update Surfaces
Levels of Details
When tessellation tools are active, Curved Poly will show tessellation hints on all selected edges. Then, you can use any of the Selection mode we have previously covered to select the edges you want to change the hints on.
On each edge there are two hints, one for each side of the edge. If you assign the same hints on both the side of the edge, curved poly will tessellate that edge with the exact amount of segments which are assigned in the LoDs table. If the hints are not the same, Curved Poly computes a continuos gradient of segments, where the segments are smaller where the hint is high, and larger where the hint is low.

Fig. 1 Controls used to assigned Hints on your selection at once, and to test tessellation and timings.
Tessellation Hints at work
Each edge has two Tessellation Hints assigned, one for each side of the edge. In order to understand how they work, I will start from the simple case in which the two values on the edge are the same.
Once a group of edges has been selected, you can also change the hints on all them at once, using the Tessellation Hints buttons. For example, we can try to switch all the edges to tessellation hint A, to see if the lowest resolution possible is aceptable on our model, or on parts of it. Above this buttons we have a choice to change the Lod assigned to the model, which is synchronized with the one you have in Curved Poly Component. On this one, the time it takes to recalculate the model is also shown. As you can see, it is quite fast.Let’s suppose that an edge as been assigned the Hint D on both sides and that the current Curved Poly is using the Default LoDs with the Close LoD active. While pointed in the Pointings Operator the edge should look like this:
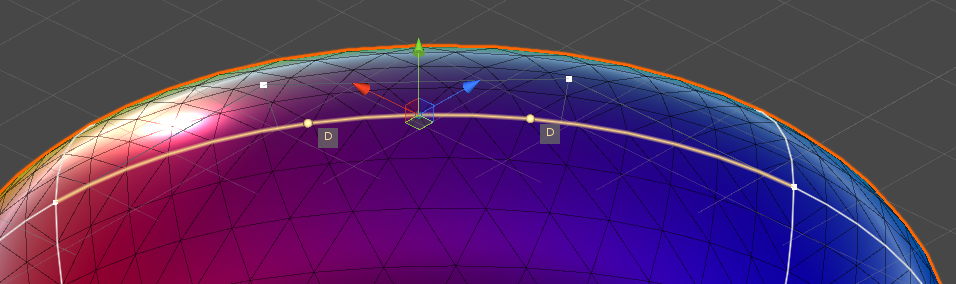
Fig. 2 Hint D + Hint D, Default Close LoD
Where I changed the Shading Mode of the Scene View to Shaded Wireframe to see the current wireframe. The value for Hint D in the Default Close LoD is 16. Indeed, the edge is tessellated uniformly with 16 segments. If you now get back to the inspector and change the LoD, you should always see that the number of segments is the same you wrote in the LoD record for the Hint D. For instance if you choose the Default Normal LoD, you will get 8 segments.

Fig. 3 Hint D + Hint D, Default Normal LoD
Let’s now change the Hints. Select the Default Close LoD in the Inspector to get back to 16 segments. Then change the Hints to Hint M to increase the tessellation. This time the edge will be tessellated with 52 segments, where 52 is the value you can find in the Default Close LoD for Hint M.
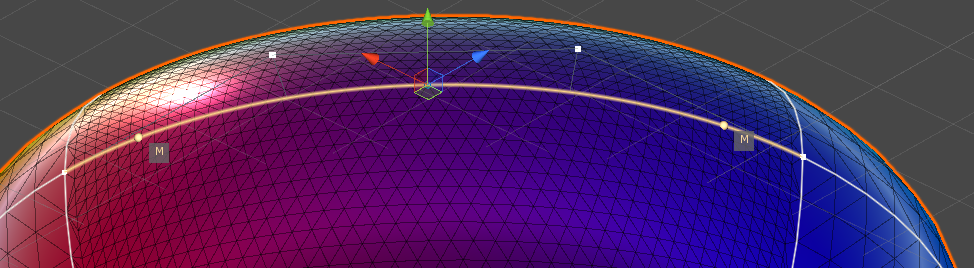
Fig. 4 Hint M + Hint M, Default Close LoD
You can easily see that the change affects both the edge and the two polygons attached to the edge. The changes in tessellation are local and will not affect the rest of the model.
Now let’s try the case with different LoDs on the same edge. We set Hint D on one side and Hint M on the other. In this way my algorithms will evaluate a smoothly distributed tessellation where the number of Segments is an intermediate value between the one of Hint D and the one of Hint M and the Segments are placed with a growing pace in order to be closer to the side where we put the higher Hint. You can easily watch how this work by slowly changing the hints on both sides.
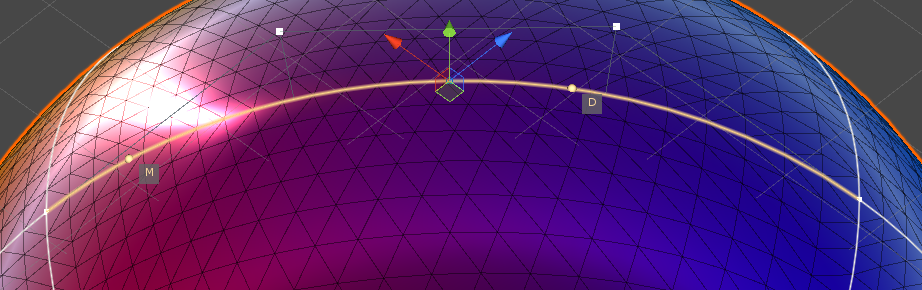
Fig. 5 Hint M + Hint D, Default Close LoD
Tessellation Level 0
Since version 1.2 of Curved Poly, you can assign a tessellation of 0 lines to some specific hint on some specific LoD. Then, every time an edge get assigned that hint on that LoD, the edge and its adjacent polygons are cut from tessellation, making the model more simple on some specific LoDs.

Fig. 6 A copy of Pepper Model, and two different LoDs for it in a custom LoDs asset. On second LoD (Far), hint A has been given a tessellation degree equal to 0. In this way details marked with LoD A are missing in the LoD only.
In order to work with this feature you need to:
- This is all about to cutting parts from tessellation, so you need to choose which parts of your model need to be cut at some LoD.
- Choose a specific hint (from A to P). It make sense to use hint A, but it also make sense to use a high hint, like P, which you will probably never use otherwise. (Hints does not, necessary, have a growing number of lines from A to P, it's up to you, and that's why we are using characters and not numbers for them). You can choose more than one to achieve more complex results.
- Assign that hint to all the parts of your model you want to be cut on some LoDs.
- Take the LoDs where you want to cut parts; on that LoD give the choosen Hint a Tessellation Degree equal to 0.

Fig. 7 A copy of Pepper Model, and two different LoDs for it in a custom LoDs asset. On second LoD (Far), hint A has been given a tessellation degree equal to 0. In this way details marked with LoD A are missing in the LoD only.
<< Prev Next >>