Curved Poly
Intro
General Features
version 1.3 News
about the Shadow Framework
Setup
How to Start
Editor Interface
Editor Windows
Tools Sets
Assets
Assets Worflow
Game Objects
Assets Upgrade to 1.3
Common Tools
Selection
Hiding and Visibility
Parts List
Shape Tools
Selection Transform
Backgrounds
Handles and Edges
Polygons
Shaping Options
Tessellation
LoDs Assets
Hints (A to P)
Composition Tools
Primitives
Custom Parts
Compositing
Materials Tools
Unwraps Tools
UV Panel
Advanced Shape Tools
Shape Edit Tools
Shapes Customization
Cutting and Splitting
Making Shapes
Exploiting other Tools
Issues and Fixing
Curves and Surfaces
Free Paths
Parametric Curves
Generating Surfaces
Update Surfaces
Setup
In order to setup Curved Poly Editor, you need to download either the Shape Editor, or the Maker, from the Asset Store. Once you have acquired a package from the asset store, you can donwload it from the package manager. Then press import. After the Package has been imported, you will find a folder name Curved Poly within your Assets folder.
Most of Curved Poly Editor resources, like icons, menus, interactive docs, are loaded the the Curved Poly folder by the editor on launch. It's not frequent, but sometimes it may happen something goes wrong during resources reload, especially after installing or updating Curved Poly (we do a lot of tests and fixes to avoid this, but we still think it may happen). That said, if you think that something went wrong and your editor is missing something, it is a good idea to force a reload on all Curved Poly Assets. One way to do so is to close the project and open it again. Another way is to select the Curved Poly Folder and look for Reimport on the available action from the menu you can open with a right-click in the Project Panel.
Gizmos
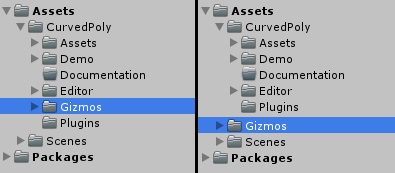
Fig. 1 Move Gizmos folder to see Gizmos in Unity Editor.
A Gizmo is an icon which Unity can use in the editor interface
to visually distinguish specific software modules from the others. There are four gizmos for Curved Poly : the Curved
Poly gizmo, the Curved
Poly Asset
gizmo, the Curved
Poly Asset gizmo, the Curved Poly LoDs Table
 gizmo anb the
Curved Poly LoDs Table gizmo. If you don't see
such icons in the Inspector, then probably you can find them at Assets/CurvedPoly/Gizmos.
If this is the case, you need to manually move the Gizmos folder from Assets/CurvedPoly/Gizmos to Assets/Gizmos.
gizmo anb the
Curved Poly LoDs Table gizmo. If you don't see
such icons in the Inspector, then probably you can find them at Assets/CurvedPoly/Gizmos.
If this is the case, you need to manually move the Gizmos folder from Assets/CurvedPoly/Gizmos to Assets/Gizmos.
This in an optional step. You can use Curved Poly - Shape Editor with or without Gizmos, so if you think you prefer to avoid moving Curved Poly assets from Curved Poly folder avoid this step.
Materials Settings
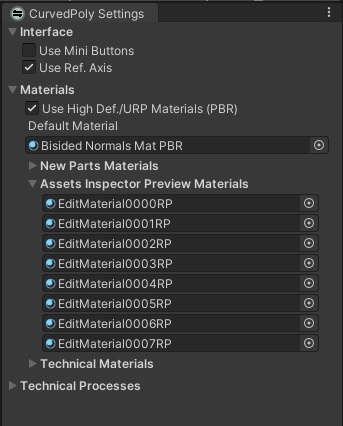
Fig. 2 Materials and other Settings
There is another important thing to fix before you start. Curved Poly can work with any rendering Pipeline, but you need to do some fix on the materials used by the editor to do so. We can work on this by opening the CurvedPoly Settings window in Tools, CurvedPoly, Others, Settings Window. Here in the Materials section, you can tell CurvedPoly to use PBR materials, or not. So, if you are using the standard pipeline, uncheck this, and if you are using some Render Pipeline check this. In this project, we are using the Universal Render Pipeline, so i need to check it. Below the check box yo can find all the materials used by the editor, which can be customized. For instance, the Default material is the material used by default on all the models, when they are imported or created from scratch. New parts Materials are the materials used on the models when they are splitted into parts. We are going to see where this materials are used in the editor later. The Assets Inspector Preview are materials used in Curved Poly Assets Inspector. So if we select one of the assets which were previously shown, we can see their preview within the inspector. If now, for instance, we switch back to Standard Pipeline materials, the materials are loaded into the preview. You need to move the mouse on the preview to update it. And if I change the materials here, they will be updated on the preview as well.
Checking your Installation
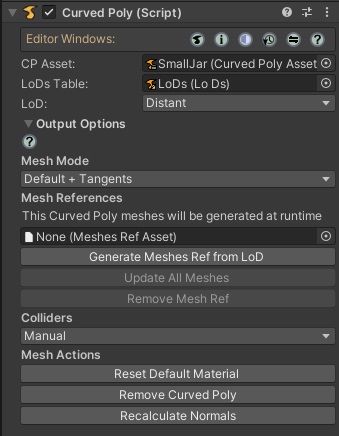
Fig. 3 Curved Poly Component
Once you are done with the first steps, One way to check if your setup was complete, is to open one of the Demo scenes available in CurvedPoly, Demo. Let's open the SamplesLibrary for instance. When you see all the models in the Scene, it means that Curved Poly runtime components are working. To check if everything is fine with the editor, you need to select one of the models. Once a model is correctly setup, the editor should show a proper set of curved building it up. The Model has a Curved Poly Component here in the inspector. In case the materials on the models are wrong, we can reset the model to the default material we have choosen in the Settings window. In order to do so, we can open the Output Options, and in Mesh Actions click on Reset Default Materials. The rest of the Component will be covered in a dedicated section.
<< Prev Next >>