Curved Poly
Intro
General Features
version 1.3 News
about the Shadow Framework
Setup
How to Start
Editor Interface
Editor Windows
Tools Sets
Assets
Assets Worflow
Game Objects
Assets Upgrade to 1.3
Common Tools
Selection
Hiding and Visibility
Parts List
Shape Tools
Selection Transform
Backgrounds
Handles and Edges
Polygons
Shaping Options
Tessellation
LoDs Assets
Hints (A to P)
Composition Tools
Primitives
Custom Parts
Compositing
Materials Tools
Unwraps Tools
UV Panel
Advanced Shape Tools
Shape Edit Tools
Shapes Customization
Cutting and Splitting
Making Shapes
Exploiting other Tools
Issues and Fixing
Curves and Surfaces
Free Paths
Parametric Curves
Generating Surfaces
Update Surfaces
Selection Transform
Fig. 1 Selection Transform Dedicated Inspector
Let's start working with Shape Tools. We have imported a sample model, and maybe we can spend some time to assign to its part some material before proceeding. This can be done by dragging the material on the model, or in the parts list.
Now, according to our selection mode and selection tool, we can select one or more elements on the model. For instance, let's select the polygons around this vertex on top of the sample. We can do this with Vertices Mode, and with the Pick tool, by first clicking on the vertex, and then pressing Grow. We could have done the same with polygons mode, and maybe the circle tool. It's up to you.
Now a transform gizmo appears at the center of our selection. It can be used to move it ... or rotate it ... or scale it, according to the unity tool which is active.
Fig. 2 Selection Transform At Work
In the Dedicated Inspector here you can find a Selection Transform tool, which is used to keep control over transforms parameters. It works pretty much as Unity Game Objects transforms. The interesting part here is the Edit Pivot section, where you can fix the reference system you transform is using. By activating the Edit Pivot Mode, we can change it's position. For instance let's say we want the editing pivot here. Now if we switch back to transform mode, we can see that the selection is rotated ... or scaled ... with respect to the new pivot position.
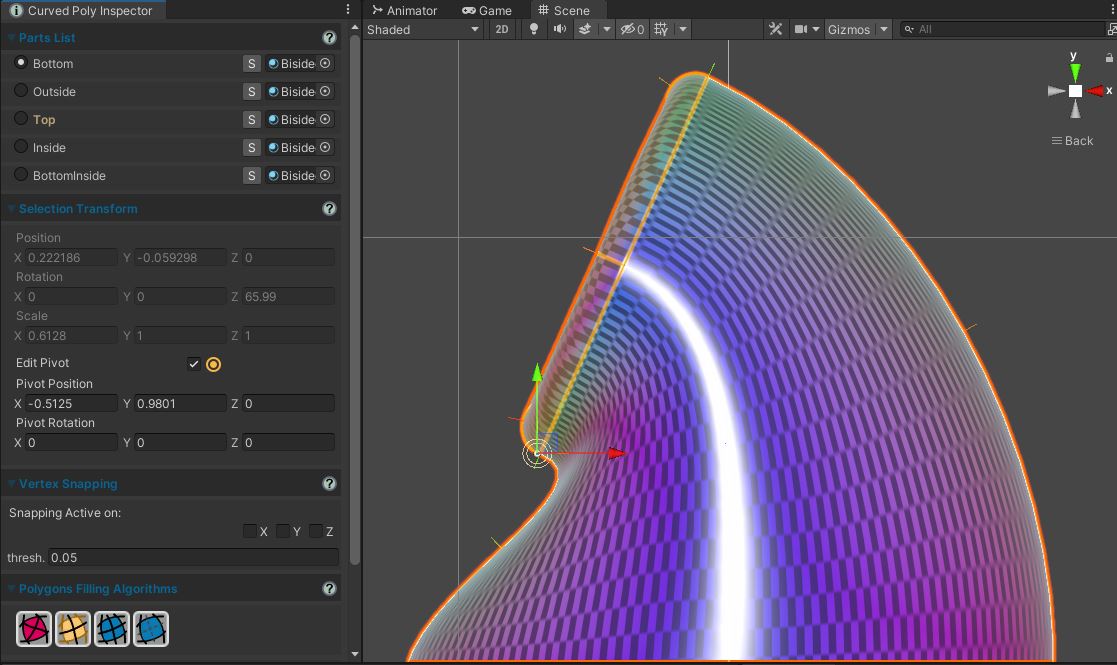
Fig. 3 Working with Custom Pivots
There is also the option to change a Pivot Rotation, but that's a bit harder to use, and requires some planning. Let's move back the pivot at the center of the selection. Now let's add a 45 degrees to the y component of the gizmo. This changes the red x axis of the gizmos. Now, if we switch back to transform mode, and we change the X component, the selection will rotate around the transformed axis, rather than the original one. Same thing if we want to scale in the direction of the new axis.

Fig. 4 Vertex Snapping Dedicated Inspector
During modeling, you may need to control the position of your selection with some precision. For instance, let's select an edge. Let's also move the gizmos at the position of one of its vertices. Now we can move the edge by dragging around that vertex. Let's now activate Vertex snapping on the x component. The default threshold will be fine. When we the the edge, the x component of it's pivot, which is its first vertex here, will shap to the x position of any other vertex. A red line is rendered here, showing that the snapping is happening.
<< Prev Next >>